Crack Climbing - a Beginner's Guide
- Details
This article originally published in Spring 2011 issue of Adventure Insider Magazine. Crack climbing is a necessary skill to climb many classic American routes. From desert towers like Castleton Tower in Castle Valley, UT to big walls like Yosemite's El Capitan and Half Dome -- if you want to climb it, you must be able to use crack techniques. Learning the basics of crack climbing will also make other climbing disciplines easier. For example, you can utilize crack techniques on a face climb to rest or stick a move. Jamming in cracks is not intuitive like face climbing. It must be learned and practiced. As you practice these techniques you will not only gain experience but open up a world of new routes. Let's begin with a bit of terminology. Climbers usually describe cracks by the appendage used to climb them, such as a hand, fist, or finger crack. Wider cracks are referred to as off-width crack and chimneys. Climbers refer to the width of a crack as it’s “size.”
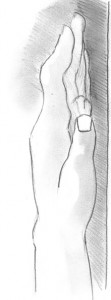
How you climb or jam a crack depends on its size relative to your body.  When climbing a finger crack, climbers apply a technique called a finger lock. This is done by stacking your fingers tightly into the crack and turning your wrist to pull down. This cams your fingers and locks them into the crack. This can be done in either the pinky up or pinky down position. Most climbers get a more secure lock with their pinky up, however it is dependent on the rock. Experiment with both and find out what you prefer. There is a good chance it will be some combination of both as the situation dictates. I feel the most secure way to attach yourself to the rock is with a hand jam. In a perfect world the hand jam is done by placing your hand inside a crack with your thumb tucked into your palm. While cupping your palm try to close your hand so that opposing pressure is placed on one side of the crack while the back of your hand and knuckles are pressing on the opposite side. As the crack gets wider you will need to cup your hand more to maintain pressure. Ideally a thumb-up hand jam is going to allow you to have a greater range of motion off of the hand jam than a thumb-down jam can allow. However there are many times you will need use both to successfully reach to top of your climb.
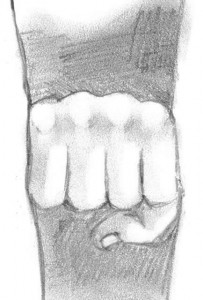
As the crack continues to get wider you will need to start jamming your fists. This is simply a matter of putting your hand in the crack and making a fist. You may find the need to adjust your hand’s orientation horizontally or vertically depending on the width of the crack or size of your hand. If you find yourself in the gray area between a hand jam and a fist jam there is a trick you can employ. Make a hand jam with your top hand and rotate your hands so the palm of your hand is facing down the crack. For your bottom hand do the opposite. It will essentially be an undercling hand jam. Once a hand jam is no longer wide enough to keep you progressing up a crack you are going to have to start getting a little more creative. And, as your creativity increases, so does your energy output.
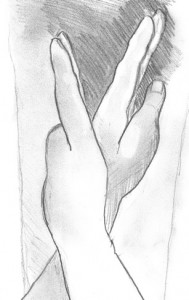
Stacking is the most common way of working up wider cracks. Do this buy putting your hand over your fist (like paper covers rock in a game of rock-paper-scissors). This along with some chicken-winging, (putting your arm in the crack with your hand on one side and your elbow on the other side, or put your arm into the crack elbow first.) will help you make progress up the crack. Practice builds confidence... and technique. As you do more crack climbing you’ll develop a great feel as to when are where are the best times to walk your hands (hand-over-hand progression) and when it is best to shuffle them (hand-to-hand progression and keeping one hand in the top position). The same is true for your feet. For example, if the crack is completely vertical it will probably feel comfortable with walking your hands and feet; conversely, if the crack is leaning to one side it is likely you will need to keep your highest hand with a thumb-down jam and will need to shuffle your hands. Your feet will also be more comfortable being shuffled.
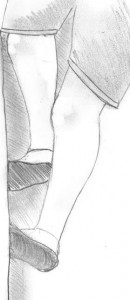
You’ll have the best body control if you keep the corresponding foot on top (i.e. right hand and right foot high) While hand jams may help you feel secure, foot jams will do just as much if not more for your confidence. However, the size of your feet and the size of the crack will do a lot to determine how easy or comfortable you will be. Also, consider your gear. I recommend getting a pair of climbing shoes that have a slightly roomier toe box and allow your toes to lay flat. (This is not the time to be cramming your feet into your 5.10 Anasasis.)  To do a foot jam you simply turn your foot so your arch is pointing up, slide your foot into the crack and straighten your foot, pushing your arch back down. As you do this it will cam your foot into the crack and you’ll be able to stand up.
The more weight you place on the foot the more secure your foot will be. The most important thing to remember is that when turning your foot for the jam, you need to use your knee to do the work turning your foot. It will allow for greater range as well as make your foot jam more secure. If you find your feet slipping or feel unsecured in the crack this is likely the fix. As the crack gets smaller you will be able to get less and less of your foot in the crack. When this happens you will need to take smaller steps and you may not feel quite as secure. In more extreme cases you will want to point your toes up the crack as you are turning turning your foot (from your knee) and place as many of your toes in the crack as you can starting with your pinky toe. Once you get a little experience under your belt you will naturally want to make the progression to leading. If you’ve had experience placing gear this will be easy to pick up. If you’re used to clipping bolts this too will be a learning experience. But here are a few tips to help you get going.
Try to get used to how the size of your gear relates to your hands. For example with my rack of Black Diamond Camelots I know that I am the happiest jamming my hands if I’m placing yellow number 2 cams. #.4 gray cams are fingertips, #.5 purples are good fingers, #.75 greens are loose fingers, #1 reds are small hands, #3 blues are fists. And, if I’m placing anything above a #3 I'm likely to be saying things that would make a sailor blush, because I’m stacking and chicken-winging in an off-width. It is also helpful under most circumstances to try not to place above your highest hand. (You will find that your gear will just be in the way.) Finally, like most any time you are on lead it is nice to have a belayer with experience. The rope has a natural tendency to want to snake into the crack and be right in the way of any gear or your hands. A couple of well timed flicks can keep the rope mostly out the way. It is likely if you have spend much time around trad climbers you have seen them with tape gloves on. While I have and will wear tape gloves I prefer to use them on the end of a trip when my hands have already given as much as they can. I personally like the feel of my hands in the crack. I find that it helps me get a better sense of how secure my jams are. If my hands are slipping I know I need to make an adjustment. While this will probably leave you with some battle scars to show off around the campfire it will also help you learn what works best for you. And, I’ve never seen a climber who had aspirations to be a hand model... There is no substitute for experience, and watching a seasoned crack climber float up super crack while you are still trying to get off the ground can be a humbling experience, but with a little patience and a lot of practice you too will be jamming your way to the top.

